Anodising aluminium
What's it all about?
Anodising is a process that increases the thickness of the natural aluminium oxide layer on the surface of aluminium. It is called anodising because the aluminium is made the anode (positive electrode) in an electric circuit.
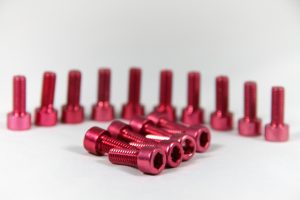
Aluminium can be anodised fairly easily, and then dyed permanently using fabric dyes or fountain pen ink. Used soft drinks cans are an inexpensive source of aluminium sheet, but you could buy new sheet instead. Anodising can be used to produce home-made jewellery and badges.
Student notes


There are four parts to this activity:
Preparing the aluminium
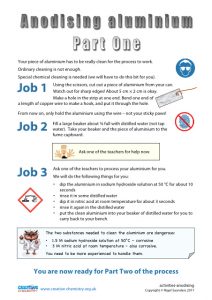
Using the scissors, cut out a piece of aluminium from your can. Watch out for sharp edges! About 5 cm × 2 cm is okay. Make a hole in the strip at one end. Bend one end of a length of copper wire to make a hook, and put it through the hole. From now on, only hold the aluminium using the wire – not your sticky paws!
Fill a large beaker about ¾ full with distilled water (not tap water). Take your beaker and the piece of aluminium to the fume cupboard. Ask one of the teachers to clean your aluminium for you. After cleaning, put it into your beaker of distilled water for you to carry back to your bench.
Preparing the anodising cell
Now you have to set up the anodising cell. Put the 500 cm3 beaker on top of some paper towels. Lay the glass rod on top of the beaker. Hang the piece of lead from the rod using the copper wire. The lead should hang just above the bottom of the beaker. Make sure that some copper wire sticks up from the rod. This will let you make an electrical connection.
Do the same thing with your cleaned aluminium strip, but don’t touch it with your hands and don’t let it touch the lead.
Anodising
You are now ready to start anodising. For it to work, you must complete the electrical cell with sulfuric acid (this will conduct electricity between the lead and aluminium). Carefully pour dilute sulfuric acid into the beaker. You need just enough to cover most of the lead and most of the aluminium strip (but leave about 1 cm above the surface).
Plug one wire into the negative terminal of the power pack. Connect the crocodile clip from this wire to the copper wire on the piece of lead.
Plug the other wire into the positive terminal of the power pack. Connect the crocodile clip from this wire directly to the top of the aluminium strip.
Cover the beaker with a piece of paper towel. During anodising, a light spray of acid is produced because of gas bubbles formed at the metal electrodes. The paper towel reduces the risk of this causing harm or damage. To start the anodising, turn on the power supply and adjust the voltage to about 15 V. The process will take about 30 minutes. Perhaps time for a break?
After 30 minutes, turn down the voltage. Turn off the power pack. Remove the crocodile clip from the aluminium strip. Carefully lift out the aluminium strip using the copper wire hook. Wash the strip in distilled water and store it in a beaker of distilled water.

Dyeing
You are now ready to colour the aluminium strip. Try one colour first, because you can be more artistic with another strip later. To colour the strip, you just put into the dye of your choice. Leave the strip in the dye for 10 minutes, but move it about a bit every minute. After 10 minutes, remove your aluminium strip from the dye solution. Put it on a watch glass. Wash it under a running tap to get rid of excess dye. To seal your aluminium strip, put it in a beaker of boiled water from the kettle for 10 minutes. The dye is now permanently sealed into the aluminium oxide layer.
Now you know how to prepare and dye the aluminium, you can let your imagination loose. Things you could try include cutting out different shapes of aluminium to anodise, using more than one dye, trickling dyes over the surface, dabbing dyes onto the surface and, for the really adventurous, sealing corners separately with boiling water, and using different dyes in between to get shading effects.
Teacher Guide
Activity notes
There are several methods for simple anodising of aluminium. We use a lead cathode with a copper wire already soldered on, but you can use a large piece of aluminium instead. Preparation and patience is important – if students rush the cleaning and anodising stages, they get a poor result. We find that many drinks cans have a thin plastic coating on the inside. This can be removed using wire wool, or left in place if only one side is to be dyed.
The cleaning stage is handled by teachers or sixth form helpers, as the reagents involved are not suitable for younger students. It is possible to clean the aluminium using a hot detergent solution instead, but we found that the results were less satisfactory. Once cleaned, the aluminium must not be touched with bare fingers.
During anodising, a fine spray of acid may be produced, so it is important to keep the beaker lightly covered by a paper towel. The first run is often the best in our experience, largely because the students concentrate and follow their instructions carefully. Later, they are tempted to rush the process – they turn up the voltage too high and reduce the run time. As a result, the metal can break at the surface of the acid, and they get a poor uptake of dye. Good students spot a faint pink or purple colour in the acid during anodising. We think this is due to traces of manganese in the alloy used in drinks cans.
Some of the best results have come from simple dyes, such as diluted fountain pen ink. Red ink gives particularly beautiful effects. Some clothes dyes also work well, especially Kingfisher Blue and Emerald Green. Orange and red dyes seem to give poor results (only a patchy sludge colour), so use fountain pen inks for these colours. A nice ‘gold’ colour can be obtained by making an aqueous solution of ammonium ethanedioate and iron(III) chloride (use approximately equal masses – harmful).
![]() Health and Safety
Health and Safety
When considering carrying out a practical activity with a class, you must check your local health and safety rules. Make an appropriate risk assessment and try the activity yourself first.
Technician notes
Per group of students:
- 2 × 250 cm3 plastic beakers
- 1 × glass rod
- 1 × watch glass
- 1 × power pack
- 2 × 10 cm lengths of copper wire
- 2 × electrical leads with crocodile clips
- 1 × lead sheet, approx. 2 cm × 5 cm [or aluminium sheet]
- aluminium drinks cans (washed)
- fine steel wool
- paper towels
- wash bottle containing distilled water
- 250 cm3 bottle of 1 M sulfuric acid, labelled “1 M sulfuric acid – Irritant”
In the fume cupboard:
- 200 cm3 of 1.5 M sodium hydroxide in a 250 cm3 beaker, labelled ‘1.5 M sodium hydroxide – Corrosive’, and placed in a water bath at 50 °C
- 200 cm3 of 3 M nitric acid in a 250 cm3 beaker, labelled ‘3 M nitric acid – Corrosive’
- distilled water in a labelled beaker, with spare water
In the lab:
- Assorted water-soluble clothes dyes or diluted fountain pen ink in covered 500 cm3 beakers – keep in a water bath at 50 °C
- kettle
- scissors
- distilled water
- nail, wooden block, hammer
![]() aluminium sheet
aluminium sheet
Beware of sharp edges and corners.
![]() lead metal
lead metal
Harmful if swallowed or inhaled. Wear gloves and avoid raising a dust. May be of concern to pregnant women.
![]() 1 M sulfuric acid
1 M sulfuric acid
Irritating to the skin and eyes. Avoid skin contact and wear eye protection.
![]() 3 M nitric acid
3 M nitric acid
Corrosive. Wear chemical-resistant gloves and splash-proof goggles.
![]() 1.5 M sodium hydroxide solution
1.5 M sodium hydroxide solution
Corrosive. Wear chemical-resistant gloves and splash-proof goggles.

